Senin, 31 Oktober 2011
Perangkat lunak bebas
Ethernet
Selayang pandang
Teknologi komunikasi baru
Definisi
Teknologi komunikasi dalam masyarakat modern seperti Amerika Serikat. Teknologi komunikasi adalah peralatan perangkat keras, organisasi, struktur dan nilai-nilai sosial yang digunakan individu untuk mengumpulkan, memproses dan bertukar informasi dengan individu lainnya. Selanjutnya, yang lebih penting adalah sifat dan bagaimana fungsi media baru bagi sebagian besar orang untuk bertukar informasi. Pada kenyataannya teknologi komunikasi baru tidak hanya ditandai dengan adanya teknologi tunggal baru seperti mikrokomputer dan satelit, tetapi menggabungkan elemen-elemen dari jenis komunikasi baru seperti menggunakan satelit untuk memberikan berbagai wid dari programming untuk sistem televisi kabel. Contoh teknologi komunikasi baru yaitu telekonferensi jaringan, elektronik sistem, papan buletin computer, dan televise kabel interaktif.
Jaringan komputer
Kamis, 27 Oktober 2011
Kode/HTML Televisi Online
Rabu, 19 Oktober 2011
openSUSE Weekly News 197
We are pleased to announce Issue 197 from openSUSE Weekly News.
This work (compilation) is licenced under Creative Commons attribution-ShareAlike 3.0 Unported License.
The rights for the compilation itself are copyright by Sascha Manns.
Selasa, 18 Oktober 2011
KONSEP JARINGAN KOMPUTER
KONFIGURASI KABEL


Prosedure pemasangan kabel UTP untuk menghubungkan perangkat-perangkat jaringan ada berapa cara :
Straight-trought
Ilustrasi pemasangan dengan cara straight-trought:

pemasangn Kabel UTP dengan cara straight-trought digunakan jika hubungan terjadi antara:
- port ethernet/fast ethernet router dengan port ethernet yang terdapat di
hub/switch

- port ethernet/fast ethernet hub/switch dengan Network adapter yang terpasang di PC

Cross-over
Ilustrasi pemasangan dengan cara Cross-over:

pemasangn Kabel UTP dengan cara Cross-over digunakan jika hubungan terjadi antara:
- Switch/hub dengan Switch/hub

- Router dengan Router

- PC dengan PC

Roll-over
pemasangn Kabel UTP dengan cara Roll-over digunakan untuk mengkoneksikan antara console router/switch dengan interface serial db9 adapater yang terdapat pada pc.


INSTALASI IP ADDRESS
- Instalasi IP address pada windows 2000
Kita dapat memasangkan alamat IP di sebuah komputer yang memiliki sistem operasi windows 2000, ikuti langkah-langkah sebagai berikukut:
- Pilih icon network neighborhood untuk windows 98 atau my network place untuk
windows 2000, kemudian klik kanan pada icon tersebut

Akan muncul tampilan seperti dibawah ini

- Setelah keluar tampilan Network and Dial-up Connections pilih icon Local Area
Conection kemudian klik kanan pada icon tersebut dan pilih properties, dan akan
menuju ke jendela local area connection. Seperti tampak pada gambar dibawah ini

- untuk memasang IP Address pada jendela local area conection. Pilih komponen
TCP/IP kemudian klik properties. Pada saat memilih komponen TCP/IP, perhatikan
dua pilihan yaitu : obtain an IP address automatically dan following IP address
yaitu IP address.
Secara Dinamic (Obtain an IP address automatically)
Komputer akan memperoleh alamat secara otomatis, alamat yang diperoleh berasal
dari komputer yang bertindak sebagai DHCP server ( komputer yang bertugas
membagi-bagikan IP terhadap client)

Secara Static (Use the following IP address )
Pengguna secara manual mengisi IP dan subnet mask. Cara ini biasa dilakukan
terhadap komputer yang bertindak sebagai server. sehingga IP address tidak akan
berubah apabila dilakukan perubahan.

Norton Internet Security 2012 dan Norton AntiVirus 2012 Rilis
 New Norton Internet Security 2012 dan Norton AntiVirus 2012 memperkenalkan beberapa teknologi baru untuk memerangi ancaman yang muncul. Ini menjaga terhadap program Fake Antivirus, salah satu ancaman yang paling luas yang dihadapi oleh pengguna internet hari ini. Untuk melawan AV Palsu, Norton sudah termasuk SONAR 4.0 dan 2.0 Daya Eraser Norton security suite terbaru. 2012 membawa dukungan untuk fitur-fitur Web Identitas Aman dan Aman di browser Google Chrome. Selanjutnya, panel jendela utama telah disederhanakan, CPU meter dan anda juga dapat menyesuaikan scan anda.
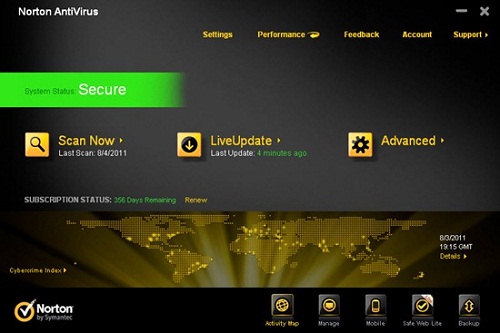 Untuk daftar Fitur Baru dan Perbaikan, periksa: Apa yang baru di Norton Internet Security 2012 dan Norton AntiVirus 2012 anda bisa melihatnya disini.
Kunjungi di sini untuk melihat perbandingan cepat antara Norton Internet Security 2012 dan Norton AntiVirus 2012.
NIS 2012 dan 2012 NAB sekarang tersedia untuk pembelian di Toko Symantec. Jika Anda menggunakan Norton 2011 produk maka Anda dapat mengupdate ke versi 2012 dengan pergi ke Dukungan dari User Interface Utama dan mengklik Periksa New Version.
Norton 2012 30 hari trial Offline Installer [Link Direct Download]
Download Windows 8 Skin Pack untuk Windows 7
 Yang harus anda lakukan hanyalah download dan install program Windows 8 skin pack tersebut ukuran file hanya 6.84Mb setelah terinstall anda akan diharuskan reboot atau restart Windows anda. Secara otomatis dari tampilan windows 7 anda akan bernuansa seperti Windows 8. seperti pada gambar diatas.
Support;
- Windows 7 SP1
- X86 (32Bit) and X64 (64Bit)
- Best Work in X86 (32Bit)
- All Language Versions
Repair File Rusak Karena Serangan Virus, Sistem dan Aplikasi
Ini adalah alat yang ampuh untuk memperbaiki file anda rusak. Scan file yang rusak dan ekstrak data maksimum dari ke file yang dapat digunakan. Aplikasi ini mendukung berbagai format file dan dokumen dan memiliki antarmuka yang sederhana untuk memperbaiki.
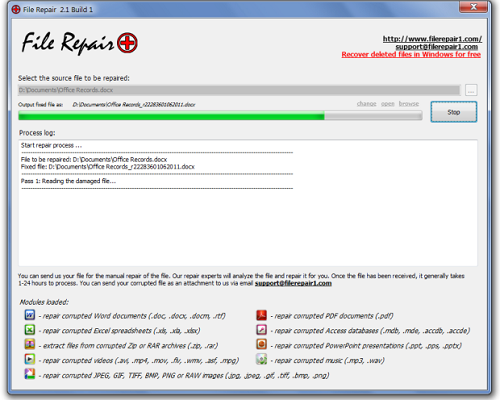 Anda hanya perlu menentukan folder di mana anda memiliki dokumen yang rusak dan aplikasi secara otomatis akan mulai memproses mereka.
Support Format File;
- Dokumen Word terkorupsi (doc,.. Docx,. Docm,. Rtf)
- Spreadsheet Excel (. Xls, XLA,.. Xlsx)
- Zip atau RAR arsip (. Zip,. Rar)
- Video (avi,.. Mp4,. Mov,. Flv, wmv,.. Asf,. Mpg)
- JPEG, GIF, TIFF, BMP, PNG atau gambar RAW (jpg,.. Jpeg, gif,.. Tiff,. Bmp,. Png)
- Dokumen PDF (. Pdf)
- Akses database (mdb,.. Mde, accdb,.. Accde)
- PowerPoint (ppt,.. Pps, pptx).
- Musik (mp3,.. Wav)
Berbagi File Antar PC Menggunakan HomeGroup di Windows 7
Untuk menggunakan fitur ini, anda harus membuat homegroup pada satu komputer dan bergabung pada komputer lainya, setelah proses selesai, anda dapat mulai berbagi file dan folder antara komputer.
 Pada gambar diatas klik tombol Create Home Group dan pilih apa yang ingin anda share dengan orang lain yang akan bergabung dengan group ini.
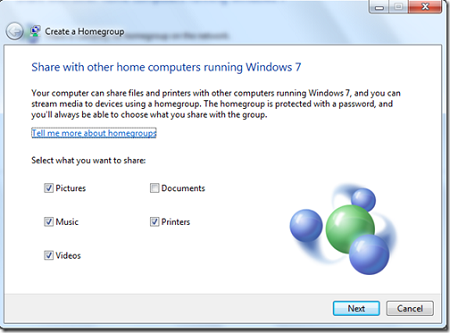 Klik Next, dan Windows akan mengambil beberapa waktu untuk memproses, dan akan menampilkan password yang digunakan untuk menyambung ke jaringan Home Group.
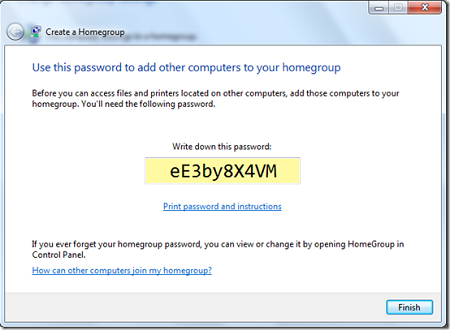 Klik Finish dan Home Group telah dibuat. Sekarang di Windows 7 komputer lain dapat bergabung dengan jaringan tertentu dengan menggunakan password yang ditampilkan di langkah terakhir.
Cara Join Home Group
Pertama-tama, Masuk ke Network And Security Center
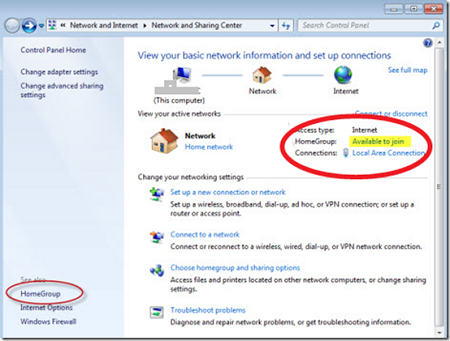 Jika Home Group tersedia, klik Available to join [lihat screenshot di atas], pada langkah berikutnya ilih apa yang anda ingin share dengan komputer lain di Home Group yang sama.
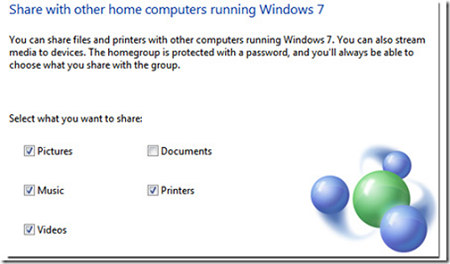 Selanjutnya anda akan diminta untuk memasukan password yang telah anda buat untuk dapat join ke Home Group.
 Anda sekarang bagian dari Home Group dan dapat mengakses file orang lain dan berbagi bersama anda dengan melalui jendela explorer disitu anda akn melihat file yang dishare.
NetworkTrafficView alat Pantau Lalu Lintas Jaringan
 Statistik paket dikelompokkan oleh Jenis Ethernet, IP Protokol, Source / Tujuan Alamat, dan Sumber / Tujuan port. Untuk setiap baris statistik, informasi berikut ini tampilan: Ethernet Type (IPv4, IPv6, ARP), IP Protokol (TCP, UDP, ICMP), Alamat Sumber, Tujuan Alamat, port sumber, port tujuan, Name Service (http, ftp, dan sebagainya), paket Hitung, Jumlah paket Ukuran, Jumlah data Ukuran, Speed ??Data, maksimum Speed ??Data, Ukuran paket rata-rata, Pertama / Waktu paket terakhir, Durasi, dan proses ID / Nama (Untuk koneksi TCP).
Anda mungkin perlu memilih adaptor jaringan untuk memonitor lalu lintas, pastikan anda menjalankan alat dalam modus administrator untuk mendapatkan rincian.
NetworkTrafficView merupakan aplikasi portabel dan tidak memerlukan instalasi. Anda dapat menekan F6 untuk menghentikan aktivitas monitor lalu lintas jaringan, F5 untuk memulai lagi, atau Ctrl + X untuk menghapus statistik jaringan lalu lintas saat ini.
Sabtu, 15 Oktober 2011
Menyiapkan perbaikan periphera
Jumat, 14 Oktober 2011
Update status Via buatan aku....-_-
Kamis, 13 Oktober 2011
Zero to Maker: Five New-Maker Pitfalls (and How to Manage Them)
David Lang is on a journey, intensively immersing himself in maker culture and learning as many DIY skills as he can, through a generous arrangement with our pals at TechShop. He’s regularly chronicling his efforts in this column — what he’s learning, who he’s meeting, and what hurdles he’s clearing (um… or not). –Gareth
When I started this Zero to Maker process, I was inspired by the idea that I could become a self-made industrial designer – that I could bypass an expensive education by learning only what I really needed to get started. Now that I’ve started down the road, I’ve realized that it’s a very long road. The good news is that I remain committed to my initial belief that there’s a less expensive (and faster) way to learn: through a strategic blend of internet resources, access to the right tools, and involvement in a community of like-minded makers. Most important for me, however, has been the commitment to trying to figure out and examine more of what I don’t know.
In a stroke of pure luck, I met someone at the Open Hardware Summit who’s thinking about exactly this. Matt Sinclair, a practicing industrial designer who is also studying for his PhD at The Design School at Loughborough University, was giving a talk on DIY Reverse Engineering during one of the breakout sessions of the Summit. In one of his first slides, he explained his research of how digital fabrication technologies (and Additive Manufacturing technologies in particular) will impact the professional industrial designer’s role and what happens when the consumer takes design into their own hands. Basically, what the self-made industrial designers aren’t thinking about.
Matt Sinclair’s project to reverse engineer a mouse
He went on to list five common issues that new makers and those of us without professional degrees tend to overlook. Matt was kind enough to summarize each of the issues into new-maker speak. By no means are these issues all inclusive or exclusive. In fact, I’m sure every maker, professional or not, runs into these issues in some form or another – the learning by doing (or mistaking) process.
Enter Matt…
Tolerances
As amazing as the computer-aided tools are, no machine or process will make a part that’s 100% accurate to the dimensions of the CAD model – it’s going to be a little off. That’s okay. Design engineers actually plan for this type of variance and set acceptable limits, which is known as tolerance. It’s easy enough for a newbie like me to figure out a tolerance for one part, probably through trial and error. The real challenge comes when you have multiple parts – each with differing materials and tolerances – that need to interact with each other. These “little” amounts of acceptable variations can add up quickly, and trying to sort out where the root problem (or problems) are can prove to be quite a headache. Cue next issue…
Functional Dimensions
Okay, you’ve got your parts back and they don’t fit together like you wanted. How do you know where the problem is? Is Feature X of Part A too big, or is Feature Y of Part B too small? The first thing to realize is that this always happens, so don’t feel bad about it (it’s why engineers use rapid prototyping and soft tooling to check before they commit to the final tools). The second thing is to anticipate problems and generate a list of dimensions, preferably in order of importance with regard to the functionality of the parts. This lets you eliminate certain features and identify others as being the source of the problem.
A rendering of Matt’s design
Post Production Finishing
The quality of surface finish from 3D printed or CNC machined parts are still a long way from what we expect from mass production processes like injection molding. If your parts are purely functional, or not visible, the surface finish may be acceptable. But if the aesthetics of your product are important then you’ll probably need to clean up, or finish, the parts. Basically there’s two ways of doing this, you can add material (by coating, in particular metalizing) or you can remove it (by sanding, polishing, sand-blasting, vapor smoothing etc). If the dimensions of your part are important, you’ll need to know how much material is added or removed by the process you choose, and design the original part accordingly.
[David's Note: This is so important. In my last post, I may have gone a little overboard about my excitement for CNC machines without mentioning the sanding we had to do afterwards because the parts didn't quite fit together. It’s truly amazing what the machines can do, but it seems to me the most experienced CNC operators know just as much about what their machines can’t do.]
Testing
The only real rule for testing your products is that the testing needs to be appropriate to the product’s use. If you’ve designed a product that’s intended to save someone’s life, you’d better be testing it a lot more vigorously than a product that’s designed to sit on someone’s shelf and look beautiful. A product doesn’t only need to perform when it’s new – you need to understand how its performance will degrade in certain conditions, and how it degrades through use. Software designers have it easy! They can release beta products and they can release bug fixes or upgrades. Almost any physical product has the capability to injure someone – saying “we’ll fix it in the next release” is almost never an option.
Redesign
More than anything else, the necessity of redesigning your product because of the points above is something that amateur makers seem to underestimate. In my professional practice, it’s not uncommon to have to redesign a product twice, so it’s the third iteration that actually gets manufactured. A client that doesn’t have this built into the project timeline is one that sets warning bells off. Accept that you’ll have to go through this process, and embrace it as a way of improving the final product, and the final stages of your product’s development will be a lot less soul destroying!
For more information on Matt and his work, please visit his website. Let us know what you think in the comments. What you would add to this list? Any stories to share?
More:
Follow David’s Zero to Maker journey
Rabu, 12 Oktober 2011
SIAPKAN ALAT-ALAT UNTUK MERAKIT PC
- Motherboard: Tempat memasang Processor,Memory,VGA dan alat-alat yang lain nya.
- Power Supply: Pemasok tenaga-tenaga komponen-komponen
- Ram/Memory: Membantu proses tranferdata pada CPU
- CD Rom: Membaca atau menulis keping CD
- HardDisk: Media penyimpanan data
- Keyboard:papan ketik atau alat memasukan data
- Mouse: menggerakan kursor
- Monitor: Menampilkan gambar/data pada layar
- Kable: Menghubungkan alat satu dengan yang lain
- Processor: Pusat kerja aktivitas pada komputer
- Casing; Wadah seluruh penyimpanan komponen yang ada pada CPU
Tool Review: DOMA Pro PCI Open Computer Case
I’m a minimalist by nature, which is what attracted me to this “no-case” from My Open PC in the first place. I have often toyed with the idea of designing something similar, myself—just a couple of panels with the bare-minimum cutouts to meet the ATX specification. While, over the long run, I think there are good reasons to keep a PC’s guts inside a hard case, in the short term, an open fixture like this has a lot to recommend it, for instance as a test fixture for experimenting with different hardware configurations. I’ve built every desktop PC I’ve ever personally owned, and between that activity and the occasional component upgrade I seem to generate a fairly consistent trickle of surplus computer equipment. And every so often that trickle pools up to the point that I can cobble together an extra working PC. That kind of kit-bashing usually requires a lot of experimentation part-swapping, and that’s exactly where this kind of open fixture excels.
These are the two biggest parts in the box, the mainboard plate and the back panel. The DOMA Pro consists of 16 total pieces of this 3/16″ CNC-milled translucent “smoke” black acrylic sheet, a case electronics package, and a box of metal hardware. There’s also a small acrylic wrench (which I did not use) for tightening the hexagonal coupling nuts used throughout assembly, a detailed parts list, and a page of instructions with nice clear isometric line drawings.
The metal hardware is very thoughtfully packaged in a six-compartment translucent polypropylene organizer with six separate snapping, hinged lids. A printed label stuck to the backside of the organizer identifies each bit by the name used for it in the instruction sheet, and there are at least one or two extras of each flavor. Such attention to detail seems characteristic of the product and its manufacturer, though they do make a couple of mis-steps, as I’ll discuss below.
The case electronics consist of two soft momentary push-button switches for power and reset functions, and one red and one green LED to indicate hard drive activity and system power, respectively, all of which come pre-wired with labelled sockets for your motherboard pins.
The fixture has space to mount one 5.25″ drive (typically an optical drive) and one or two 3.5″ drives slung under the mainboard plate. Assembly begins by screwing small one-size-fits-all acrylic side panels to your drives, which then interlock with the mainboard plate, riding underneath it where the drive side panels double as supports for the front edge of the case.
The drive assemblies are locked in place by a pairs of small cams sliding on hexagonal coupling nuts secured to the mainboard plate. This trick—using cheap hex standoffs as bearing surfaces for moving parts—is one of a couple of examples of clever CNC-panel design the DOMA Pro includes. It’s repeated with only slight variation in the locking bar mechanism that secures the top corners of the PCI cards in place—much faster than screws, but more secure than just letting the cards sit loose in the slots.
Assembly to the stage shown here took me a leisurely hour, or thereabouts. I went on to add motherboard, video card, and power supply, and then to do a bunch of drive-swapping in the course of scratching together a Linux box for use with my garage CNC equipment. Then I transferred the working setup to a traditional hard case.
The only significant problem I had with the DOMA Pro, as it came from the manufacturer, was that it was wobblier than I like. Which is to say, wobblier than it had to be. Specifically, the bolted joints at the corners between mainboard and back panels were loose, which lead to a bit of racking along the short horizontal dimension. Without having actually asked the designers about it, I’d guess the sloppy fit at these joints is caused by badly-specified hardware. Whipping out the micrometer shows that the acrylic panels are very close to nominal 3/16″ thickness at 0.185″, while the coupling nuts that pass through them, which I bet are nominally 3/8″ (0.375″) are a bit long at 0.385″. I ended up shimming mine out with bits of tape between the two acrylic panels, and the problem went away.
The other small problem I had was with the female one-pin socket on the end of the positive leg of the system power LED. Specifically, it fell off after a single installation-removal cycle. Easily fixed, of course, but a bit annoying.
Overall, I really like this case both in theory and in practice. And considering its accessible price, it remains a great value in spite of the one or two small problems I had during assembly.


