Pages

Kamis, 13 Oktober 2011

Zero to Maker: Five New-Maker Pitfalls (and How to Manage Them)

Zero to Maker: Five New-Maker Pitfalls (and How to Manage Them):

David Lang is on a journey, intensively immersing himself in maker culture and learning as many DIY skills as he can, through a generous arrangement with our pals at TechShop. He’s regularly chronicling his efforts in this column — what he’s learning, who he’s meeting, and what hurdles he’s clearing (um… or not). –Gareth


When I started this Zero to Maker process, I was inspired by the idea that I could become a self-made industrial designer – that I could bypass an expensive education by learning only what I really needed to get started. Now that I’ve started down the road, I’ve realized that it’s a very long road. The good news is that I remain committed to my initial belief that there’s a less expensive (and faster) way to learn: through a strategic blend of internet resources, access to the right tools, and involvement in a community of like-minded makers. Most important for me, however, has been the commitment to trying to figure out and examine more of what I don’t know.


In a stroke of pure luck, I met someone at the Open Hardware Summit who’s thinking about exactly this. Matt Sinclair, a practicing industrial designer who is also studying for his PhD at The Design School at Loughborough University, was giving a talk on DIY Reverse Engineering during one of the breakout sessions of the Summit. In one of his first slides, he explained his research of how digital fabrication technologies (and Additive Manufacturing technologies in particular) will impact the professional industrial designer’s role and what happens when the consumer takes design into their own hands. Basically, what the self-made industrial designers aren’t thinking about.


Matt Sinclair’s project to reverse engineer a mouse


He went on to list five common issues that new makers and those of us without professional degrees tend to overlook. Matt was kind enough to summarize each of the issues into new-maker speak. By no means are these issues all inclusive or exclusive. In fact, I’m sure every maker, professional or not, runs into these issues in some form or another – the learning by doing (or mistaking) process.


Enter Matt…


Tolerances

As amazing as the computer-aided tools are, no machine or process will make a part that’s 100% accurate to the dimensions of the CAD model – it’s going to be a little off. That’s okay. Design engineers actually plan for this type of variance and set acceptable limits, which is known as tolerance. It’s easy enough for a newbie like me to figure out a tolerance for one part, probably through trial and error. The real challenge comes when you have multiple parts – each with differing materials and tolerances – that need to interact with each other. These “little” amounts of acceptable variations can add up quickly, and trying to sort out where the root problem (or problems) are can prove to be quite a headache. Cue next issue…


Functional Dimensions

Okay, you’ve got your parts back and they don’t fit together like you wanted. How do you know where the problem is? Is Feature X of Part A too big, or is Feature Y of Part B too small? The first thing to realize is that this always happens, so don’t feel bad about it (it’s why engineers use rapid prototyping and soft tooling to check before they commit to the final tools). The second thing is to anticipate problems and generate a list of dimensions, preferably in order of importance with regard to the functionality of the parts. This lets you eliminate certain features and identify others as being the source of the problem.


A rendering of Matt’s design


Post Production Finishing

The quality of surface finish from 3D printed or CNC machined parts are still a long way from what we expect from mass production processes like injection molding. If your parts are purely functional, or not visible, the surface finish may be acceptable. But if the aesthetics of your product are important then you’ll probably need to clean up, or finish, the parts. Basically there’s two ways of doing this, you can add material (by coating, in particular metalizing) or you can remove it (by sanding, polishing, sand-blasting, vapor smoothing etc). If the dimensions of your part are important, you’ll need to know how much material is added or removed by the process you choose, and design the original part accordingly.


[David's Note: This is so important. In my last post, I may have gone a little overboard about my excitement for CNC machines without mentioning the sanding we had to do afterwards because the parts didn't quite fit together. It’s truly amazing what the machines can do, but it seems to me the most experienced CNC operators know just as much about what their machines can’t do.]


Testing

The only real rule for testing your products is that the testing needs to be appropriate to the product’s use. If you’ve designed a product that’s intended to save someone’s life, you’d better be testing it a lot more vigorously than a product that’s designed to sit on someone’s shelf and look beautiful. A product doesn’t only need to perform when it’s new – you need to understand how its performance will degrade in certain conditions, and how it degrades through use. Software designers have it easy! They can release beta products and they can release bug fixes or upgrades. Almost any physical product has the capability to injure someone – saying “we’ll fix it in the next release” is almost never an option.


Redesign

More than anything else, the necessity of redesigning your product because of the points above is something that amateur makers seem to underestimate. In my professional practice, it’s not uncommon to have to redesign a product twice, so it’s the third iteration that actually gets manufactured. A client that doesn’t have this built into the project timeline is one that sets warning bells off. Accept that you’ll have to go through this process, and embrace it as a way of improving the final product, and the final stages of your product’s development will be a lot less soul destroying!


For more information on Matt and his work, please visit his website. Let us know what you think in the comments. What you would add to this list? Any stories to share?


More:

Follow David’s Zero to Maker journey


Rabu, 12 Oktober 2011

SIAPKAN ALAT-ALAT UNTUK MERAKIT PC

ALAT:Obeng plus yang bermagnet.
KOMPONEN:
  • Motherboard: Tempat memasang Processor,Memory,VGA dan alat-alat yang lain nya.
  • Power Supply: Pemasok tenaga-tenaga komponen-komponen
  • Ram/Memory: Membantu proses tranferdata pada CPU
  • CD Rom: Membaca atau menulis keping CD
  • HardDisk: Media penyimpanan data
  • Keyboard:papan ketik atau alat memasukan data
  • Mouse: menggerakan kursor 
  • Monitor: Menampilkan gambar/data pada layar
  • Kable: Menghubungkan alat satu dengan yang lain
  • Processor: Pusat kerja aktivitas pada komputer
  • Casing; Wadah seluruh penyimpanan komponen yang ada pada CPU

Tool Review: DOMA Pro PCI Open Computer Case

Tool Review: DOMA Pro PCI Open Computer Case:


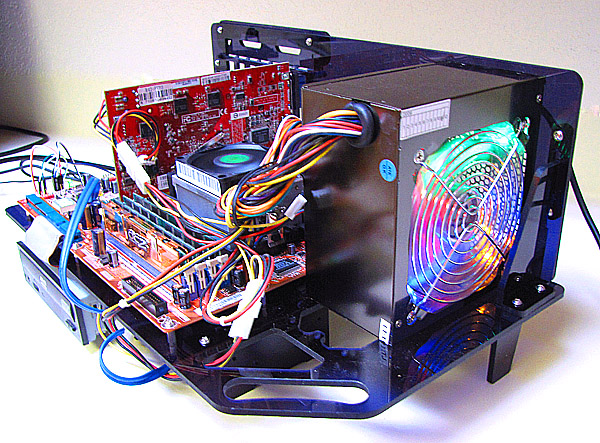
I’m a minimalist by nature, which is what attracted me to this “no-case” from My Open PC in the first place. I have often toyed with the idea of designing something similar, myself—just a couple of panels with the bare-minimum cutouts to meet the ATX specification. While, over the long run, I think there are good reasons to keep a PC’s guts inside a hard case, in the short term, an open fixture like this has a lot to recommend it, for instance as a test fixture for experimenting with different hardware configurations. I’ve built every desktop PC I’ve ever personally owned, and between that activity and the occasional component upgrade I seem to generate a fairly consistent trickle of surplus computer equipment. And every so often that trickle pools up to the point that I can cobble together an extra working PC. That kind of kit-bashing usually requires a lot of experimentation part-swapping, and that’s exactly where this kind of open fixture excels.


These are the two biggest parts in the box, the mainboard plate and the back panel. The DOMA Pro consists of 16 total pieces of this 3/16″ CNC-milled translucent “smoke” black acrylic sheet, a case electronics package, and a box of metal hardware. There’s also a small acrylic wrench (which I did not use) for tightening the hexagonal coupling nuts used throughout assembly, a detailed parts list, and a page of instructions with nice clear isometric line drawings.


The metal hardware is very thoughtfully packaged in a six-compartment translucent polypropylene organizer with six separate snapping, hinged lids. A printed label stuck to the backside of the organizer identifies each bit by the name used for it in the instruction sheet, and there are at least one or two extras of each flavor. Such attention to detail seems characteristic of the product and its manufacturer, though they do make a couple of mis-steps, as I’ll discuss below.


The case electronics consist of two soft momentary push-button switches for power and reset functions, and one red and one green LED to indicate hard drive activity and system power, respectively, all of which come pre-wired with labelled sockets for your motherboard pins.


The fixture has space to mount one 5.25″ drive (typically an optical drive) and one or two 3.5″ drives slung under the mainboard plate. Assembly begins by screwing small one-size-fits-all acrylic side panels to your drives, which then interlock with the mainboard plate, riding underneath it where the drive side panels double as supports for the front edge of the case.


The drive assemblies are locked in place by a pairs of small cams sliding on hexagonal coupling nuts secured to the mainboard plate. This trick—using cheap hex standoffs as bearing surfaces for moving parts—is one of a couple of examples of clever CNC-panel design the DOMA Pro includes. It’s repeated with only slight variation in the locking bar mechanism that secures the top corners of the PCI cards in place—much faster than screws, but more secure than just letting the cards sit loose in the slots.


Assembly to the stage shown here took me a leisurely hour, or thereabouts. I went on to add motherboard, video card, and power supply, and then to do a bunch of drive-swapping in the course of scratching together a Linux box for use with my garage CNC equipment. Then I transferred the working setup to a traditional hard case.


The only significant problem I had with the DOMA Pro, as it came from the manufacturer, was that it was wobblier than I like. Which is to say, wobblier than it had to be. Specifically, the bolted joints at the corners between mainboard and back panels were loose, which lead to a bit of racking along the short horizontal dimension. Without having actually asked the designers about it, I’d guess the sloppy fit at these joints is caused by badly-specified hardware. Whipping out the micrometer shows that the acrylic panels are very close to nominal 3/16″ thickness at 0.185″, while the coupling nuts that pass through them, which I bet are nominally 3/8″ (0.375″) are a bit long at 0.385″. I ended up shimming mine out with bits of tape between the two acrylic panels, and the problem went away.


The other small problem I had was with the female one-pin socket on the end of the positive leg of the system power LED. Specifically, it fell off after a single installation-removal cycle. Easily fixed, of course, but a bit annoying.


Overall, I really like this case both in theory and in practice. And considering its accessible price, it remains a great value in spite of the one or two small problems I had during assembly.


Kamis, 22 September 2011

Samsung Unveils Flexible Android Smartphone

Samsung Unveils Flexible Android Smartphone:

Think a flexible smartphone is just science fiction? You might have to think again, thanks to Samsung. The Korean company recently unveiled Galaxy Skin, an Android smartphone that can take on different shapes and take on even hammer blows, set for a 2012 Q2 release.

So aside from its flexible form, what specs can Galaxy Skin boast of? For starters, it will have a flexible 4″ AMOLED display (800×480) made of plastic polyimide substrate. Samsung already confirmed that they have started production of such screens. This form of AMOLED technology consumes less energy but still delivers good screen brightness compared to the normal Samsung AMOLED screens.

Other known specs of Galaxy Skin include 1 GB RAM; 1.2 GHz processor; 8 MP rear camera and VGA front camera with auto focus, self-portrait, stop motion, action shot, and Panorama shots; and 1500 mAh battery. Connectivity-wise, it has Bluetooth 3.0, USB 2.0, and Wi-Fi 802.11 b/g/n features. It will reportedly run on Android Jellybean (the next Google OS version after Ice Cream Sandwich), but there are speculations that Google will make a special version for it, namely Android Flexy.

With the Galaxy Skin, one can have table clock, smart projector, or even a wristwatch. Now we await Apple’s statement regarding this.

via IBTimes

Related posts:

  1. Rumored Samsung Galaxy Q to Be a Bit of Smartphone, a Bit of Tablet
  2. Nexus Prime, Samsung Galaxy S III Possibly Among Deluge of Upcoming Samsung Android Devices [Updated with Release Dates]
  3. Samsung Galaxy S II with 4G LTE Sighted in South Korea, Codenamed Samsung Celox

Rabu, 21 September 2011

HackPGH’s Ping Pall Drop

HackPGH’s Ping Pall Drop:


Pittsburgh hackerspace HackPGH used leftover helium from their LEAD Balloon project to facilitate another project: the Aerial Ping Pong Drop. They filled biodegradable party balloons and launched origami butterflies and ping pong balls into the atmosphere. What for, you ask? They used Egg-Bots to write a URL on each ball, so that when it was found, the finder could enter his or her latitude and longitude into a form, which populates a Google map.


Cara Bikin Templeate Blogs

Okeee, bagi kalian yang pengen tau TUTORIAL mengganti Templeate Blogs bisa di kunjungi di page blogs ini => http://kolom-tutorial.blogspot.com/

jangan lupa iyah baca and kasih komentar kalian mengenai posting-posting dari saya....